Want to learn more about surgical guide planning?
Discover how digital workflows can improve your implant success rates.
Table of Contents
Immediate loading — placing a prosthesis within 48 hours of implant insertion — is one of the most demanding protocols in implant dentistry. For patients, it means leaving the practice with functional teeth the same day. For clinicians, it means every millimeter of implant positioning must be perfect.
There is no room for "close enough." If the implant is 2mm off position or 5° off angle, the provisional prosthesis will not seat correctly, the screw access hole will emerge in the wrong location, and the case fails — in front of the patient.
This is why surgical guide design for immediate loading carries higher stakes than any other guided surgery application.
An implant placement technique that uses a physical surgical guide to direct drills and implants to positions planned in 3D software. It improves accuracy and reduces surgical risks compared to freehand placement.
A 3D-printed template that fits over the patient's teeth or tissue and directs drill placement during implant surgery. It transfers the digital treatment plan into precise physical drill positions.
Prerequisites for Immediate Loading
Not every case qualifies. The following conditions must be met:
- Primary stability: Minimum 35 Ncm insertion torque
- Bone quality: Cortical engagement at the implant apex (Type 2 or 3 bone preferred)
- Implant positioning: Must enable splinting and proper load distribution
- Patient factors: No active bruxism, adequate oral hygiene compliance
- Prosthetic readiness: PMMA shell or provisional framework must be prepared in advance
Guide Design: What Changes for Immediate Loading
Precise Depth Control
In delayed loading, minor depth variations can be compensated during prosthetic fabrication weeks later. In immediate loading, the implant depth must be exact — because the provisional prosthesis is fabricated to the planned position.
The surgical guide must provide:
- Calibrated sleeve height for accurate depth stops
- Clear markings for drill sequence
- Compatibility with the specific guided surgery kit being used
Prosthetic-Driven Planning
starts with the prosthesis, not the bone. The digital workflow proceeds in this order:
- Design the ideal tooth positions (digital wax-up)
- Determine optimal implant positions to support those teeth
- Verify bone availability at those positions
- Adjust only if necessary — bone shapes the compromise, not the starting point
The screw access channel must emerge through the occlusal or palatal surface. Buccal emergence is unacceptable for aesthetic reasons and long-term prosthetic maintenance.
Multi-Unit Abutment Compatibility
Most immediate loading cases use multi-unit abutments (e.g., Nobel MUA, Straumann Variobase) to correct angulation between the implant axis and the prosthetic axis.
The guide design must account for:
- Available prosthetic space above the multi-unit
- Angulation correction limits (typically ±30°)
- Minimum distance between adjacent abutments
PMMA Shell Integration
Many immediate protocols use a pre-fabricated PMMA shell that is converted chairside during surgery:
- The shell is designed digitally alongside the implant plan
- It is milled or printed before surgery
- During surgery, temporary abutments are placed and the shell is adapted
- The patient leaves with a complete provisional arch
The surgical guide must ensure that implant positions correspond exactly to the shell architecture. Any discrepancy means chairside modification — which adds time, stress, and unpredictability.
Flapless vs. Flap Approach
cases often use flapless surgery (no tissue reflection), which offers:
- Faster healing
- Less post-operative swelling
- Better soft tissue preservation
But flapless surgery removes visual access to the bone. The surgeon relies entirely on the guide for positioning. This makes guide accuracy even more critical.
Our Approach at SurgicalGuide.Pro
For immediate loading cases, we follow an enhanced planning protocol:
- Digital wax-up verification before implant placement
- Prosthetic screw access hole simulation
- Multi-unit abutment height verification
- Cross-sectional bone analysis at each implant position
- Drilling report with per-implant torque recommendations
FAQ
Can you design the PMMA shell as well?
We focus on surgical guide design and implant planning. For PMMA shell design, we recommend coordinating with your dental lab — we provide all the positional data they need.
What minimum torque value do you plan for?
We plan for a minimum of 35 Ncm insertion torque. If bone quality appears insufficient on CBCT, we flag the case for discussion before finalizing the plan.
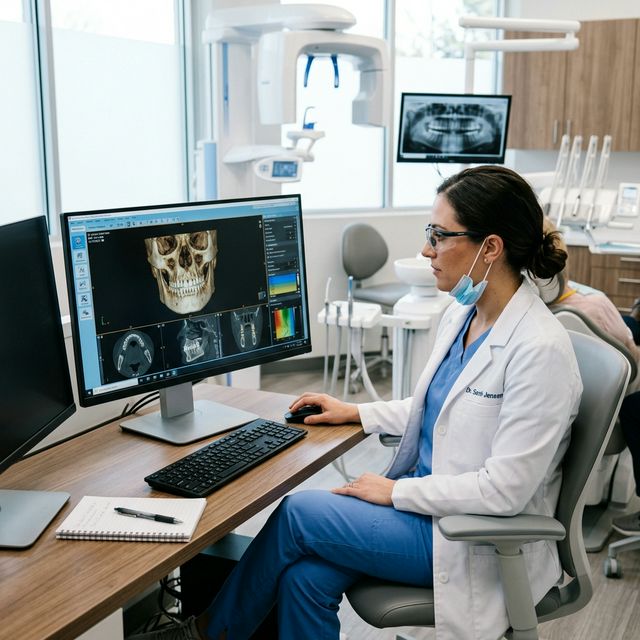
A 3D imaging technique that captures the jaw, teeth, and bone structure in a single rotational scan. It produces DICOM files used for implant planning, nerve mapping, and surgical guide design.
Do you support immediate loading for All-on-4 cases?
A full-arch implant rehabilitation protocol where 4-6 implants support a complete fixed prosthesis. It allows immediate loading, meaning patients receive teeth on the same day as surgery.
Yes. All-on-4 immediate loading is one of our most common case types. We design fully guided protocols with tilted posterior implants and verify prosthetic clearance for the conversion prosthesis.
---
Planning an immediate loading case?
Upload your CBCT and STL for prosthetic-driven planning.
Ready to streamline your surgical guide workflow?
Join 200+ dental professionals who trust SurgicalGuide.Pro for precision planning.